G Router Initializing Process Bridge Setup: A Comprehensive Guide
Understanding the concept of bridge setup in a G router can be a daunting task, especially for those who are new to the world of home networking. The G router, in particular, has gained popularity for its reliability and efficiency. In this article, we will delve into the intricacies of the G router initializing process bridge setup, providing you with all the necessary information to configure your device and enhance your internet coverage.
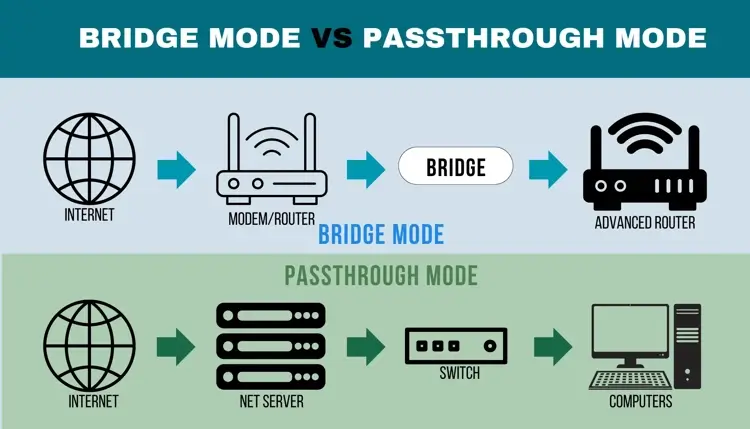
What is Bridge Mode on a G Router?
A bridge mode on a G router allows the device to act as a network bridge, connecting two separate networks and allowing devices on one network to communicate with devices on the other network transparently. This setup disables the routing and wireless capabilities of the device, letting it function only as a modem or access point.
Benefits of Bridge Mode on a G Router
- Improved Network Stability: By disabling the routing capabilities of the device, bridge mode ensures that your network remains stable and free from congestion.
- Enhanced Security: With bridge mode enabled, a single administrator can only authorize routing to the network, adding an extra layer of security to your setup.
- Efficient Use of Resources: By configuring your G router in bridge mode, you can make the most of your device's resources and ensure that it operates at optimal levels.
Step-by-Step Guide to Enabling Bridge Mode on a G Router

This particular example perfectly highlights why G Router Initializing Process Bridge Setup is so captivating.
Enabling bridge mode on a G router is a relatively straightforward process. Here's a step-by-step guide to help you through the process:
Step 1: Log in to Your G Router
Start by accessing your G router's web-based interface. You can do this by typing the IP address of your router in a web browser and logging in with your admin credentials.
Step 2: Navigate to the Advanced Settings
Once logged in, navigate to the advanced settings section of your G router's web interface. This is usually located under the "Advanced" or "Advanced Setup" tab.
Step 3: Locate the Bridge Mode Option

In the advanced settings section, look for the bridge mode option. This is usually labeled as "Bridge Mode" or "Bridge Setup". Click on this option to access the bridge mode settings.
Step 4: Configure the Bridge Mode Settings
Once you've accessed the bridge mode settings, configure the necessary settings to enable bridge mode. This may include selecting the bridge interface, setting the IP address, and configuring the network settings.
Step 5: Save and Apply the Changes
After configuring the bridge mode settings, save and apply the changes. This may require restarting your G router or applying the changes manually.
Common Issues with Bridge Mode on a G Router
While bridge mode on a G router can be a great way to enhance your network performance, there are some common issues that you may encounter. Here are some troubleshooting tips to help you resolve common issues:
Issue 1: Connectivity Issues
Issue 2: Incompatible Devices
Issue 3: IP Address Conflicts
IP address conflicts can occur when multiple devices on the network are configured to use the same IP address. To resolve this issue, try assigning a static IP address to your device or reconfiguring the network settings.
Conclusion
Configuring bridge mode on a G router can be a complex process, but with the right guidance, you can achieve a stable and efficient network setup. In this article, we've provided a comprehensive guide to help you understand the benefits and drawbacks of bridge mode, as well as step-by-step instructions on how to enable bridge mode on your G router. By following these tips and troubleshooting common issues, you can ensure that your G router operates at optimal levels and provides you with a reliable and fast internet connection.


 - YouTube")
![View of [Guide] How to use Genexis Modem in Bridge Mode - TechEnclave](https://preview.redd.it/4th-utility-using-my-own-router-uk-v0-nc5jtq86gssb1.jpg?width=640&crop=smart&auto=webp&s=08fe503a4f82faea00e2b3ef44ea7aa6cd0306ee "[Guide] How to use Genexis Modem in Bridge Mode - TechEnclave")


 - GL.iNet Router Docs 4")


 - faurit.com")
 Self-Install Kit")

